 etworks
and Infrastructure VPN Serviceetworks
and Infrastructure VPN Service
etworks
and Infrastructure VPN Serviceetworks
and Infrastructure VPN Service
NOTE: Before installing the Cisco AnyConnect VPN Client you will need Admin rights to your machine. You may have to arrange this through your relevant local IT support.
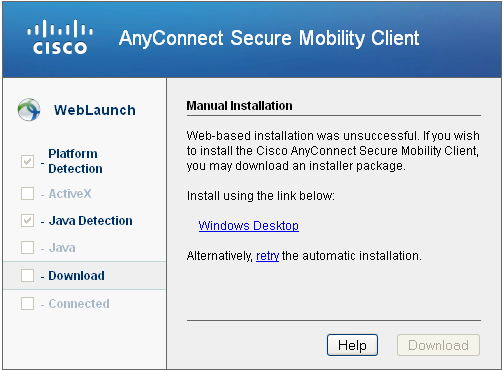
In the event that your client is not installed automatically, the screen below will appear. Just click on the link within the window to start the installation process.
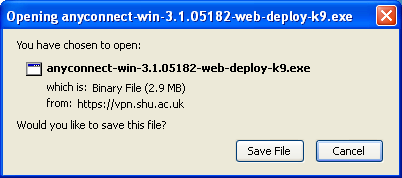
Next, click save to save the AnyConnect client locally to a temp folder then run it from there by double-clicking the file and accepting the defaults.
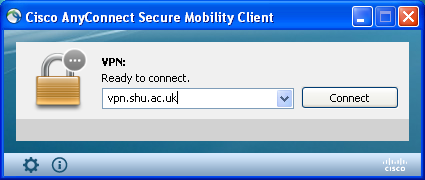
When the AnyConnect client is installed, to connect for the first time, run the Cisco AnyConnect Secure Mobility Client, enter vpn.shu.ac.uk in the connect to box, then click Connect.
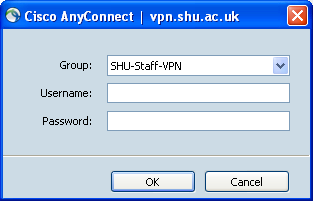
Next enter your username and password then click OK.
Once the connection has been created, the client will minimise and appear as an icon with a padlock in the Windows notification icons.
![]()
The connection to the VPN is complete.
If you use WebLaunch to start AnyConnect on a Mac and the Java installer fails, a dialog box presents a Manual Install link. Proceed as follows:
1. Click on the circled link within the window .
(A dialog box presents the option to save the vpnsetup.sh file.)
2. Save the vpnsetup.sh file on the Mac.
3. Open a Terminal window and use the CD command to navigate to the directory containing the file saved.
4.
Enter the following command: sudo
/bin/sh vpnsetup.sh
(The
vpnsetup script starts the AnyConnect installation)
5. Following the installation, choose Applications > Cisco > Cisco AnyConnect Secure Mobility Client to initiate an AnyConnect session.
Note: You may need to enter vpn.shu.ac.uk in the connect to box, followed by your username and password then click Connect.
Launch your web browser and go https://vpn.shu.ac.uk
Login with your IT Services username and password.
A Java Applet will run which will try and install the client automatically. It will fail and you will be offered a link to download the client for manual installation. Download the file which is called vpnsetup.sh
Launch a Terminal and navigate to where you saved the file and run it. If you don't know where it was saved it's probably in a directory called Downloads.
$ cd Downloads
$ chmod u+x vpnsetup.sh
$ sudo ./vpnsetup.sh
You can then launch the client using the icon 'Cisco AnyConnect VPN Client' in the menu under Applications -> Internet.
When you run the client for the first time you may have to enter vpn.shu.ac.uk in the 'Connect to:' field.
If you want to launch the Cisco VPN client from the command line you can do so with
$ /opt/cisco/vpn/bin/vpnui